Wednesday, March 28, 2018

How To Choose Pressure Washers For Commercial Kitchen Cleaning

How To Choose Pressure Washers For Commercial Kitchen Cleaning

Image source: https://rpwprowash.com/wp-content/uploads/2013/09/Northern-IL.-Hood-cleaning-service1.jpg

How To Choose Pressure Washers For Commercial Kitchen Cleaning

A clean kitchen means safe and clean food. By ensuring that the food customers enjoy is safe for consumption, it greatly increases the chance of repeat business and recommendations through word of mouth. The right pressure washer can make it easy to clean a commercial kitchen, delivering a powerful jet stream of water capable of blasting away the most stubborn dirt and grime.

Choosing the right pressure washer can be a tricky business. There are many different types of washers designed for different purposes and different kitchens. This article will help you choose the right pressure washer for your commercial kitchen.

#1 Make sure to choose carefully between petrol, diesel and electric pressure washers

Pressure washers work by taking water from a water tank or a mains supply and driving the water through a powerful motor that will deliver a strong stream of water through a hose at the other end.

Petrol and diesel washers give off dangerous carbon monoxide emissions when used. They require special ventilation so that the emissions can be removed safely.

Electric washers, however, do not give off any such emissions. They can be used safely indoors with the minimum of fuss. Generally, electric washers are the washers of choice for commercial kitchens.

#2 - Make sure the bar rating is adequate for your needs

The bar rating indicates how powerful the jet stream is on a particular pressure washer. The higher the rating, the more powerful the jet stream.

Washers with adjustable bar ratings are also available. These washers allow the bar rating to be changed so that the appropriate bar rating is used for the task at hand.

Other washers have adjustable nozzles that are able to change the strength of the jet stream. By focusing the stream on a smaller area, it is possible to increase the water pressure of the jet stream. Likewise, by spreading the stream out over a larger area, the washer can put out a lower pressure stream.

#3 Make sure the water flow rating is adequate for your needs

The water flow rating determines how much water a particular pressure washer can output. The higher the flow rating, the more water the pressure washer is capable of pushing.

#4 Make sure the hose length is long enough

Although it may sound like Im stating the obvious, this is a very simple detail to overlook. Make sure to pick a pressure washer that has a hose length that is long enough to target the hard to reach areas.

#5 Choose between a hot or cold water pressure washer

Cold water washers only output cold water streams. Hot water washers, however, are capable of shooting out a jet stream of hot water. With these, it is possible to clean grills and other pieces of kitchen equipment quickly and effectively. The heat from the hot water will loosen built-up grease, dirt and grime to make their removal, an easier task. Many washers also have the capability of mixing in soap with the water for an even deeper clean.

An effective pressure washer can make it easy and painless to clean a commercial kitchen in minutes. They save the business considerable amounts of time and help keep a commercial kitchen spotless and clean. Any kitchen would benefit greatly from the use of a pressure washer.

Tuesday, March 27, 2018

How to Choose Different Styles of Double Glazed Windows

How to Choose Different Styles of Double Glazed Windows

Image source: https://s-media-cache-ak0.pinimg.com/736x/21/a6/e5/21a6e5eaf0e787afefbbd61c07ecd86b.jpg

How to Choose Different Styles of Double Glazed Windows

Before you try to choose which double glazed window you want to go with, you should first look at the style of your home. If you have something that's a little more classic, you'll want to go with something classic as well when you seek out windows. If you have a more modern home, there are a variety of modern styles that you can go with instead. You can even go with extremely versatile woodgrain finishes if you wish to do that as well. This will let you keep the overall aesthetic of your house while also making a change that will keep it up to date.

In this post, we're going to show you how to choose different double glazed window styles that you can implement. There are many styles of double glazed windows, so we'll look at each and show you what to expect.

Measure for double glazed windows.

Before you start looking at double glazing window styles, you'll first need to know how to measure for these double glazed windows.

In order to accurately price your particular double glazed window, you'll have to measure accurately the area that they're being placed in. This sounds pretty daunting, but it's actually really simple if you follow a couple of rules.

- Measure the width from one plaster to another and the height from the windowsill to the plaster.

- When you're building your online quote, they'll accept measurements in millimetres, centimetres, and inches. You should take an average of three measurements from the width to the height.

- Take a measurement of the bottom of your windowsill to the floor. If this is below 80 cm, you'll have to use toughened glass as well in order to meet regulations.

Once you have your measurements set, you can go ahead and start looking at double glazed window designs. Now that we've gotten an idea as to how to measure for your double glazed windows, we can actually take a look at some of the window designs that are out there. Let's get started.

uPVC Casement Windows

The uPVC casement window is extremely versatile and is suitable for a number of applications. These windows feature a single-lever latch design and are easy to open and close. This makes them especially suitable for places that are a little hard to reach in your house.

Another application of these windows is in the kitchen, usually behind the kitchen sink. This way they're very accessible, even in tough to reach places. These are also very good for an emergency exit. The window swings open wide which will allow you to easily climb through no matter what's going down.

These are also safer windows for use in your upper floor, so putting them up there is definitely a sound decision.

uPVC Bow and Bay Windows

These double glazing window designs are best for people who want to add some identity and character to their home. Any window space that's flat can be converted into this style of double glazed window and will give a sense of heightened space.

These windows also include additional dummy sashes which will create equal sight lines and enhance the overall appearance of your home.

You can also install hidden bay poles which will go under the windowsill and serve as a way of taking on a load while staying structurally sound. You won't have to worry about whatever goes on the windowsill with this application.

uPVC Tilt and Turn Windows

If you're living on the top floor or even a couple floors up, the uPVC tilt and turn windows are a great option to go with.

This design style is available for many types of contemporary and traditional homes. It offers easy clean functionality, a great level of ventilation and enhanced security with its tilt only option. This lets you ventilate your home while keeping the property safe.

It also opens all the way, allowing for exterior access if you choose. The benefit here is that you can clean the whole window without ever having to step outside.

Vertical Sliding Sash Windows

This type of window provides the same kind of characteristics as a traditional property whilst maintaining all of the benefits and functionality of a uPVC window.

This is a great choice if you're looking to maintain the overall charm of your property. Maybe you're looking to replace old Sliding Sash windows that are made from timber, but you don't want to choose a wooden build. This is understandable if you want to upgrade but aren't quite sure what style you actually want. Vertical sliding sash windows are always a good choice of double glazed window.

uPVC Sash Horn Windows

This window is similar to the vertical sliding sash in that it combines a traditional aesthetic with modern materials. This provides both functionality and style. Also just like the vertical sliding sash, this is a great option for people who want to maintain that traditional charm while adding something a little bit different.

Although this window is more suited for traditional properties, it can also be used on modern properties that want to have a more traditional look and feel about them. These are structurally reliable. They're energy efficient and hand finished, which means they're suitable for just about any property.

Final Thought

Before you try to choose which double glazed window you want to go with, you should first look at the style of your home. If you have something that's a little more classic, you'll want to go with something classic as well when you seek out windows. If you have a more modern home, there are a variety of modern styles that you can go with instead. You can even go with extremely versatile woodgrain finishes if you wish to do that as well. This will let you keep the overall aesthetic of your house while also making a change that will keep it up to date.

How to choose Best kitchen Chimney

How to choose Best kitchen Chimney

Image source: http://www.hipcleaning.com/wp-content/uploads/2016/07/kitchen-vent-hood-cleaning.jpg

How to choose Best kitchen Chimney

We have shortlisted a portion of the focuses which you have to consider while purchasing best kitchen chimney. Do check these focuses, and get the best 10 best Kitchen Chemney for Indian Kitchen.

Suction Power Is the limit of the engine to suck oil particles and scent. It is estimated in cubic meter per hour(m3 every hour). For Indian kitchen a fireplace with higher air suction limit is perfect. For visit cooking the range ought to be between 400 m3/hr to 1000m3/hr relying upon the extent of your kitchen. The Chimney with a long hose have by and large more suction control.

Channels If the channel does not work appropriately the suction ends up noticeably poor and can represent a wellbeing danger. The decision of the correct channel enhances the execution of the chimney.

Engine/Blower The engine ought to be fixed with the goal that clean and grime does not get into it. Aluminum non-stick blower and engine spares you from distress of occasional adjusting of inner parts.

Estimate The size relies upon the extent of the kitchen. A 3feet stove ought to have a 3feet fireplace. Standard Chimney come in 2ft and 3ft size.

Upkeep and Care It is prudent to go for a fireplace which requires less support. Introduce the fireplace at low stature (4feet) with the goal that cleaning is simple and it viably expels the smoke and oil particles out.
Spending Electric fireplaces come in the value scope of Rs 3000 to Rs 100000.

Clamor The commotion that is heard is that of the air course. You may get a kick out of the chance to think about this before purchasing your chimney. Some fireplaces have a quiet unit introduced which makes it quiet or less commotion.

Speed Entry level fireplaces have single speed choice yet propelled ones have variable paces to ventilate the kitchen Chimney.

Feel Chimneys are accessible to suit each area and taste of the general public extending from unobtrusive rates to costly ones. Contingent upon your financial plan, way of life and kitchen stylistic layout you may pick the best. A few brands have the alternative of redoing the hopes to coordinate your kitchen stylistic layout.

Guarantee and Service Most Chimney accompany guarantee of a year however some fireplaces accompany lifetime guarantee. Check for after deals benefits in your region since some astound channels require specialist for cleaning them.

Top 10 Best Kitchen Chimney
Best Auto Clean Kitchen Chimney

How To Choose A Copper Sink

How To Choose A Copper Sink

Image source: https://i2.wp.com/www.rafael-home-biz.com/wp-content/uploads/2017/04/how-to-choose-undermount-kitchen-sinks-design-ideas-and-decor-for-how-to-choose-a-kitchen-sink-how-to-choose-a-kitchen-sink-elite-to-suits-your-needs.jpg

How To Choose A Copper Sink

If you are considering a new sink within your kitchen or bathroom, a copper sink may be the way for you to go. Many people are choosing copper sinks over other traditional styles such as porcelain. The reason the popularity of copper sinks has grown so drastically is because not only does it have a simplistic beauty unmatched by any other style, it is also extremely functional within the kitchen. The great thing about copper sinks is that they are virtually maintenance free, if it needs cleaned water and soap will do the trick.

Chemical cleaners are a thing of the past when it comes to copper sinks, they do not require harsh cleaning and with care its beauty will last a lifetime. Another positive aspect of copper sinks is that unlike many other types of sinks, these tend to grow in beauty over time. With age, the copper sink will change its color, however, if you do not want the color to change, you can simply use a furniture or brass wax to prevent it. Copper sinks makes things a whole lot easier on your life.

Another great aspect of the copper sink is that it is overall cleaner and more sanitary than other material types. Copper is a natural elemental that contains antibacterial benefits, therefore bacteria and other harmful substances cannot hope to survive on copper. In a study performed on, stainless steel and copper, it was shown that copper is extremely sanitary by comparison. Thanks to the antibacterial benefits of copper, a bacterium that is found on the copper will not live any longer than one to two hours.

When purchasing a copper sink you will want to look for a few specific things. Make sure you consider the d(c)cor and look of your home; this will help you understand the type of copper sink you will want. Another thing is to make sure the copper sink is made by hand and not manufactured in a factory somewhere; this will help ensure that you are getting a quality copper sink for your home.

When it comes down to actually purchasing your copper sink, make certain you are purchasing a copper sink of high quality. Yes, price is an important factor for everyone today, however remember the old saying, "You get what you pay for". This saying holds true with copper sinks as well. The cheaper a copper sink becomes, the less copper it is actually made of. Cheaper copper sinks are typically made of recycled copper, this means that the copper comes from machines or computers that used copper. This further means that the copper used in your copper sink, could only be 90% pure or even less.

Monday, March 26, 2018

How To Care For Your Sterling Silver Cubic Zirconia Jewelry

How To Care For Your Sterling Silver Cubic Zirconia Jewelry

Image source: https://shop.zamels.com.au/kwp-content/uploads/2016/11/935965-2.jpg

How To Care For Your Sterling Silver Cubic Zirconia Jewelry

With just a little foresight, you can make your sterling silver cubic zirconia jewelry last a long, long time. Maintaining that just-bought-it-off-the-store luster and shine can be a little easier if you practice more care with your jewelry pieces. Sterling silver in itself is a hardy material. It does not break, crack or chip easily. Cubic zirconia too is just as resilient, and can usually resist cleaving or flaking. However, the stress on the jewelry pieces can sometimes increase especially when the same pieces are being worn on an almost 24/7 basis. Here are some tips on how to properly wear, store and clean your sterling silver cubic zirconia jewelry.

Wearing and removing your jewelry pieces at the right time

If you have to wear your sterling silver cubic zirconia jewelry for most of the day (and the night too,) you have to make sure that you take these off on at least one or two occasions. You can place your jewelry in your jewelry box or at the top of your night stand (wooden surfaces are best) if you are taking a bath, or even just washing your hands. Leaving your valuables on one corner of the kitchen sink not only increases the chances of your jewelry going down the drain; but stainless steel and ceramic finishes on the sink can cause tarnishes as well. Hard water plus detergent can likewise cause discoloration on both the sterling silver and your cubic zirconia gem. If you have to use any chemical solution like lotions, perfumes, carpet cleaners, or dog shampoo; it would be prudent to remove all your sterling silver cubic zirconia jewelry for the time being.

Even bathing in the pools and oceans can cause irreparable damage to your jewelry. Chlorine in most pools causes sterling silver to turn yellow; while the salt in the open waters can rob your cubic zirconia of its shine making it look cloudy and dull.

Storing your jewelry pieces properly

Never store your jewelry wet. Although this sounds like an uncommon thing to say, you might be surprised to find out how many people actually let their valuables air dry after getting wet. Sterling silver, in particular, is prone to water stains - very much like what you see in cars that have been allowed to air dry. These water stains are equally difficult to remove. In many cases, such stains will only come out if you seek professional cleaning services from the jeweler. You can avoid the emergence of these unsightly water stains on your sterling silver cubic zirconia jewelry if you make sure that you dry your jewelry pieces with a dry non-abrasive paper towel first. Buff them gently with soft fabric until it regains their shine, before finally storing them away.

Occasional professional cleaning is required

Even if you clean and buff your jewelry pieces regularly, there will come a time when you would have to take your valuables to the nearest jeweler for some professional cleaning. Home solutions may be cheaper, but may also cause permanent damage to some of your pieces if you misuse the chemicals. A once-a-year professional cleaning will bring back the luster of your gems, and can get the accumulated grime and dirt out of jewelry corners, joints and all those hard to clean places.

How to Build Solar Panel -- Materials Needed to Construct a Solar Power Generator

How to Build

Image source: https://i.ytimg.com/vi/Ypb8D4L1jqc/maxresdefault.jpg

How to Build Solar Panel -- Materials Needed to Construct a Solar Power Generator

The first step in learning how to build a solar panel is in knowing what materials and components are needed. The parts listed in this article is meant for building a solar panel capable of powering up small appliances like your garden sprinkler or automatic gate opener.

Now, let's look at the materials we need:

Solar Cells

You have two options -- to buy new solar cells or salvage used ones. Obviously it'll be more costly to buy new solar cells. If you're on a budget, used photovoltaic cells will do fine...and you can even get broken solar cells and join them together. But if you're not comfortable doing this, it will be less frustrating to work with new solar cells instead.

Plywood

You'll need three-eighth inch thick plywood and these are easily available in your local hardware store. Some art supply shops sell high-quality plywood frames, so you can use this as well if you know how.

Jones Plug

A 2-pin Jones plug is necessary to connect your solar panel to the rest of the solar powered circuit. This enables the solar panel to be detached easily for maintenance when necessary.

Silicone Caulk

This is a waterproof seal that is commonly used for fixing bathtubs and kitchen sink.

Super glue and screws

Some super glue (or wood glue) is needed to hold the pieces together before you turn the screws in. Wood glue will take much longer to dry, so super glue is recommended.

Wires

The best types of wire for a solar panel are those that come as a twisted pair of red and black. Chances of mixing up their polarity reduce dramatically with these types of wire.

Paint

Since the solar panel is placed outdoor, it is necessary to protect the wood from elements such as precipitation, dew and moisture.

Diode

The diode ensures that electricity only flows from the solar panel into the battery, never in the opposite direction. This is to make sure that the battery is not discharged into the solar panel during the night.

Plexiglass

This is a protective cover over the solar cells. Plexiglass is often preferred over glass because it doesn't break easily and is easier to handle.

Battery

Having a battery ensures that your appliance continues to run even at night or on very cloudy days.

The above are the components you need to put together a solar power system that can supply electricity to a small appliance. When you have accumulated more experience, you can substitute these materials for better ones. As for now, these the easiest materials to work with.

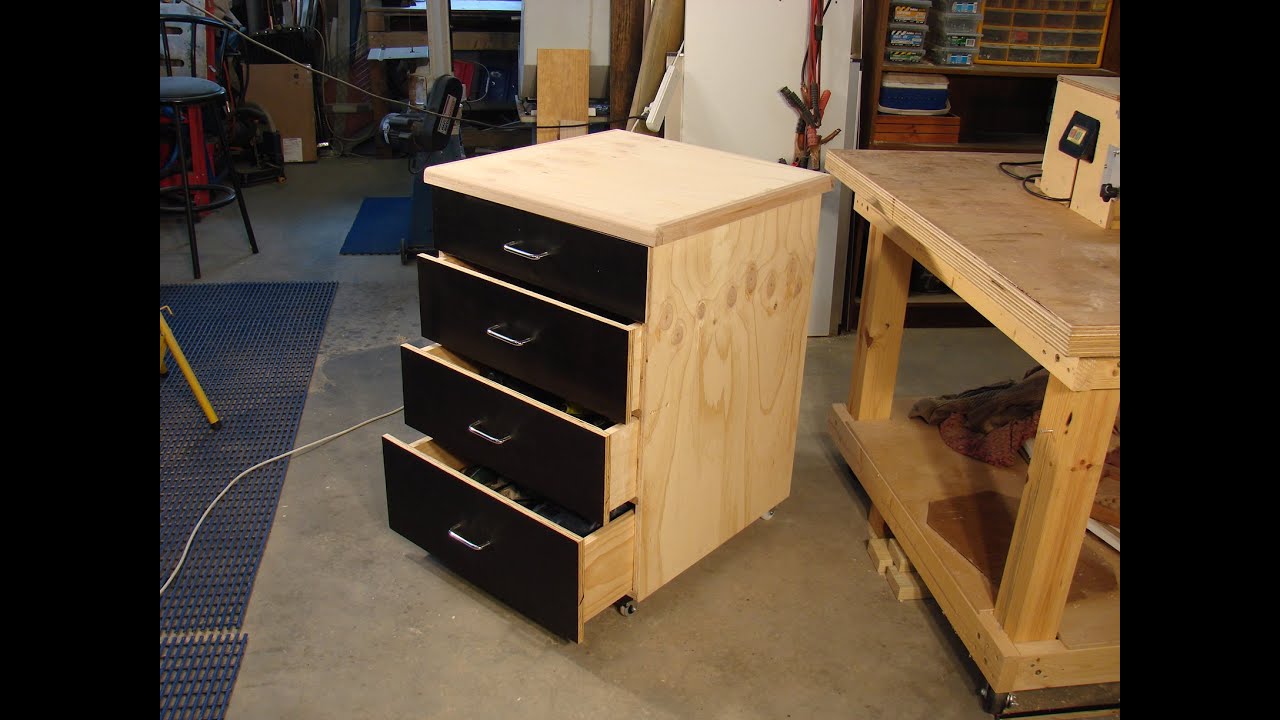
How to Build a Cabinet From Scratch Plans Materials and Tools

How to Build a Cabinet From Scratch Plans Materials and Tools

Image source: https://i.ytimg.com/vi/dqZzgf5FpBU/maxresdefault.jpg

How to Build a Cabinet From Scratch Plans Materials and Tools

For most people, having plenty of storage space in their home is crucial. It is no wonder that most of homeowners have storage cabinets in as many places and rooms. Storage cabinets are never enough...They are often needed in many places other than just the kitchen and bathroom. However, buying ready-to go cabinets from a shop can be very expensive. On top of that, it's often hard to find a cabinet that exactly suits your purposes.

This mainly because walls, ceilings and floors are never going to be perfectly straight or level. This means that, whether you decide to buy your cabinet or to build it with your own hands, you must to take these imperfections into account. For those of you who love woodworking and are looking for advice on how to build a cabinet from scratch here are a few tips...

First of all, in order to figure out how to build a cabinet that suits both the purpose and the location in your home, it is important to have the right plans and materials.

Sketching the plan on a piece of paperor on your computer (if you know how to use autocad) including all measurements will give an overall idea of how much wood you will have to buy and also of how well your new cabinet will fit in the room. Spend enough time trying out different options. However,make sure that any changes in design must be done before ordering materials, parts or components to maximize your value. This will help you go through the process of building a cabinet with less frustrations and cost overruns. Purchase the finest tools you can afford, low cost tools generally break down faster.

As soon as you are sure of how much timber you need, it is time to head to the lumber yard. When considering the materials to useemploy, keep in mind that most cabinets are built using melamine-based materials. These are an excellent choice because they are resonably priced, easier to cut, fire retardant, heat-resistant, moisture proof and scratch-resistant among their main properties.

You should use 4'X8' sheets of plywood or melamine 5/8" or 3/4" thick. There are many choices in edge banding that should match your melamine or cabinet doors. Importantly, in order for the cabinet to get a fine finish, the edges of the cut sides must be covered.

Also, if you decide to build your cabinet with wood, it's always a good idea to stain the single components before you put them together. It's just easier to get an even coat because there are no inside corners to reach. Before you assemble it's also a good idea to drill any shelf pin holes.

Important tip regarding tools...unless you want to be a pro, in most cases, you can outsource the production of a part.

Go to a shop where there is a dado saw, wall saw, table saw and a chop saw. Make sure all the blades on the equipment you are using are sharp and tightened into place before using them. Wear safety goggles when using the saws. Place fused melamine sheet onto the wall saw carefully.

Use half-inch plywood to build cabinets from scratch. Build them in sections without doors. You can add doors after you have built the framing. Install the basic framework box of the cabinets directly to the 2x4 studs you've secured to the walls.

Nail plywood over the framing to enclose the cabinetry. Install particle board or plywood shelves back inside of the storage sections. Make the doors out of plywood or buy pre-made doors.

Again, before you start building your cabinet, make sure you have a detailed plan and a checklist of all the materials and tools you need.

How to Create a Strong Promotion Strategy for a Greeting Card Company

Image source: http://web.printingcenterusa.com/hubfs/Marketing_Brochure_Blog/2foolproof-tips-for-creating-great-copy-image.png?t=14939312984...